Planets · Moon · Sun
The planets, the lunar surface, and the Sun are bright targets within the Solar System, and their high-resolution imaging follows a methodology entirely different from deep-sky photography. Deep-sky targets are faint and require long exposures to accumulate signal, with signal-to-noise ratio being the main limitation; Solar System targets are bright and signal-rich, so the real limitation is astronomical seeing—turbulence in Earth’s atmosphere distorts the light wavefront, causing the image to shimmer and blur continuously. The strategy is therefore not to lengthen the exposure but to use high-frame-rate video with extremely short exposures to freeze instants of turbulence, then select and stack the sharpest frames from a large number of them. This page systematically explains the concepts, parameters, and post-processing tools involved in this workflow.
Astronomical seeing and the principle of lucky imaging
Section titled “Astronomical seeing and the principle of lucky imaging”Seeing refers to the degradation of imaging quality caused by atmospheric turbulence, manifesting as blur, scintillation, and distortion. The mixing of air masses at different temperatures causes the refractive index along the light path to vary rapidly and randomly; under long exposures a point source is spread into a seeing disk, whose size is measured in arcseconds by its full width at half maximum (FWHM).
| Parameter | Definition | Typical values |
|---|---|---|
| Seeing disk FWHM | Angular diameter of a long-exposure star image | Excellent < 0.4″, typically good about 1″, poor 2″–4″ |
| Fried parameter (r0) | The scale of an atmospheric “cell” over which the refractive index is approximately uniform; also the equivalent aperture at which a ground-based telescope can reach the diffraction limit | About 5 cm at a poor site, about 20 cm at a high-altitude excellent site (visible light) |
| Coherence time (t0) | The timescale over which the turbulence state changes significantly, proportional to r0 / wind speed | On the order of milliseconds |
A telescope with an aperture smaller than r0 has its resolution limited by diffraction; when the aperture exceeds r0, resolution no longer improves with increasing aperture but is instead locked by seeing at the level corresponding to r0. This is precisely why large telescopes struggle to deliver their full resolution under poor seeing.
Lucky imaging is a speckle-imaging technique. Its core idea is to capture thousands upon thousands of frames with single-frame exposures short enough (usually ≤ 100 ms, and in practical planetary imaging often a few milliseconds) that the atmosphere is nearly “frozen” within each frame; because turbulence fluctuates randomly, there are always a few instants when the wavefront happens to be smooth, and the sharpness of these frames approaches the telescope’s diffraction limit. By selecting only the sharpest fraction from the large number of frames and aligning and stacking them, one can approach the resolution attainable in the absence of turbulence.
Planetary cameras and video capture
Section titled “Planetary cameras and video capture”Planetary imaging does not take single frames; instead, a planetary camera records a high-speed video lasting from tens of seconds to several minutes. Such cameras are mostly CMOS sensors with small pixels and high frame rates, transferring data over high-speed USB3. The video is usually saved as .ser (which supports raw Bayer data and precise timestamps) or .avi, and lossy compression such as H.264 that would destroy detail should be avoided.
Key settings during capture:
| Setting | Recommended practice | Notes |
|---|---|---|
| Data format | RAW / .ser, 1:1 pixel readout | Avoid interpolation and lossy compression |
| Single-frame exposure | Short (a few milliseconds) | Freezes instants of turbulence, the prerequisite for lucky imaging |
| Gain | Raise moderately | Trades for sufficient brightness and a higher frame rate while keeping the exposure short |
| Frame rate (fps) | As high as possible (USB3 can reach hundreds of fps) | The more sharp frames captured per unit time |
| Histogram | Peak around 70%–80%, avoid overexposure | Planetary surface detail must not enter saturation |
| Debayering of color cameras | Choose a suitable demosaicing algorithm during post-processing | The debayering method significantly affects the final detail |
Boosting frame rate with ROI cropping
Section titled “Boosting frame rate with ROI cropping”A planet occupies only a small part of the frame. Setting the camera to read out only a region of interest (ROI)—for example 640×480 rather than the full frame—greatly reduces the data per frame and multiplies the frame rate. The higher the frame rate, the more sharp frames captured per unit time, which directly improves the final result. The ROI should be cropped to just enclose the planet’s disk with some margin for alignment.
Focal extension and sampling matching
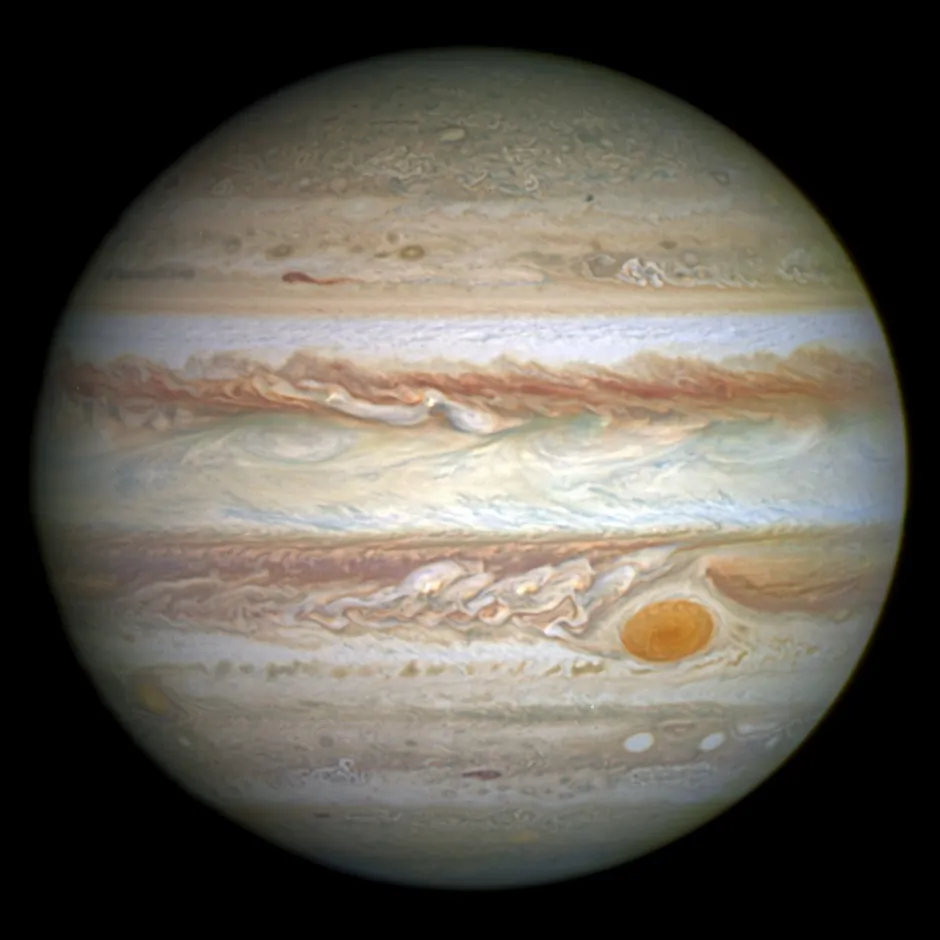
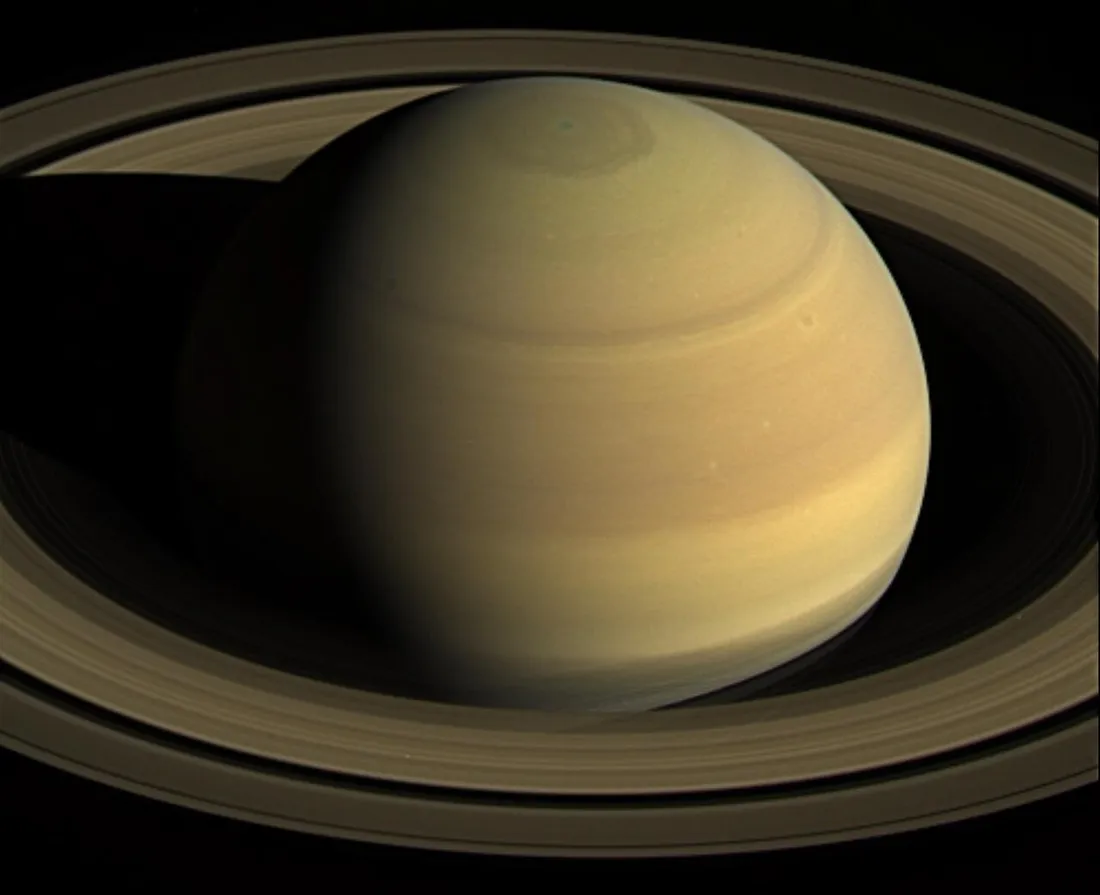
Section titled “Focal extension and sampling matching”Planets have very small apparent diameters (Jupiter is at most about 50″, Saturn’s disk about 18″), so a sufficiently large focal ratio is needed to magnify the image to a scale matching the camera pixels, a process called sampling matching. Undersampling loses resolution; oversampling wastes frame rate without adding real detail.
- Focal extenders: add a positive lens group such as a Barlow lens or Powermate behind the main telescope, typically 2×–5×, to extend the effective focal length and magnify the Airy disk to match the pixels.
- Rule of thumb for sampling: take the working focal ratio as roughly “pixel size (µm) × (3–7)”. With good seeing take about 5×, and up to 7× under excellent conditions; under average seeing reduce the magnification to trade for a wider field and higher frame rate. For example, with 4.3 µm pixels the target focal ratio on a good night is about
f/ ≈ 4.3 × 5 ≈ f/20; a monochrome camera with 2.9 µm pixels reaches critical sampling at aboutf/12for 500 nm. - Additional consideration for color cameras: the Bayer array increases the effective sampling spacing, so a higher focal ratio is required to reach critical sampling (a color camera with 2.9 µm pixels needs about
f/18).
Working focal ratio ≈ pixel size (µm) × N (N is 3–7; the better the seeing, the larger the value)Effective focal length = telescope focal length × Barlow magnificationEffective focal ratio = effective focal length / apertureAtmospheric dispersion corrector (ADC)
Section titled “Atmospheric dispersion corrector (ADC)”When a planet is at a low altitude, the atmosphere acts like a prism that separates light of different wavelengths by color, producing distinct blue and red fringes at the upper and lower edges of the disk; this phenomenon is called atmospheric dispersion. An atmospheric dispersion corrector (ADC) uses a pair of weak prisms that rotate in opposite directions about the optical axis to produce an oppositely directed, adjustable-strength dispersion that “bends” the atmospheric dispersion back.
- An ADC does not change the system’s focal ratio, but where it is placed affects the cone angle: it is usually installed between the Barlow lens and the camera/eyepiece, in the higher-focal-ratio segment of the light path, to reduce the incoming cone angle and lower aberrations such as astigmatism.
- An ADC works best at high focal ratios (generally requiring > f/15, ideally > f/20), which matches the focal-extension and sampling requirements of planetary imaging perfectly.
- It is especially critical for Jupiter and Saturn, which are often at low altitudes; the closer the target is to the zenith, the weaker the atmospheric dispersion and the smaller the ADC adjustment required.
Rotation constraints and derotation
Section titled “Rotation constraints and derotation”A planet’s rotation moves surface detail during capture, so an overly long video will be smeared by rotation, which limits the duration of a single video clip. Jupiter rotates fastest (period about 9.9 hours) and imposes the tightest constraint.
| Target | Suggested limit per video clip | Main reason |
|---|---|---|
| Jupiter | About 1–2 minutes | Extremely fast rotation, with cloud belts shifting quickly |
| Mars | About 4–5 minutes | Rotation period close to a day, but with fine surface detail |
| Saturn | About 5 minutes | Fairly fast rotation, but with relatively soft disk detail |
Derotation uses dedicated software (such as WinJUPOS) that, following a planetary rotation model, rotates and aligns frames or stacked results from different times at the pixel level to the same reference longitude, allowing data spanning a longer time or multiple clips to be combined while eliminating rotation blur. Two typical uses:
- Stack and sharpen several clips from the same night individually, then use WinJUPOS, based on precise timestamps, to measure and derotate them into a single image, significantly reducing noise and allowing stronger sharpening.
- Derotate a single longer video (over 10 minutes) frame by frame and then stack, integrating thousands of frames into a single ultra-smooth result.
In addition, any residual RGB channel offset remaining after ADC correction can be aligned with WinJUPOS’s R/G/B derotation/registration tools.
Lunar photography
Section titled “Lunar photography”Lunar imaging uses the same method as planetary imaging: record high-frame-rate video plus lucky-imaging frame selection and stacking. Targets differ markedly with lunar phase:
- Near the terminator: here the Sun illuminates at a low angle, and craters, mare ridges, and other terrain cast long shadows, giving the strongest three-dimensional appearance—this is the best region for capturing lunar surface detail; at full Moon there are almost no shadows and contrast is low, making it suitable for recording the light-and-dark patterns and ray systems of the maria rather than terrain.
- Mosaic: the Moon’s apparent diameter is far larger than the camera’s field of view, so it is often necessary to record several video clips of separate sections, stack each, and then stitch them into a full-Moon or large-region close-up.
- Selection percentage: the lunar surface has high contrast and rich features, so usually selecting only about the best 10% of frames is enough for a sharp result.
For background on lunar phases, libration, and the like, see the apparent motion of Solar System bodies.
Solar photography and safety
Section titled “Solar photography and safety”The Sun’s visible, ultraviolet, and infrared radiation is extremely intense, and it must be attenuated with dedicated filtration before it can be imaged. Two common types:
- White light: a solar filter film or a Herschel wedge attenuates the light intensity to a safe level, allowing observation of sunspots, granulation, and faculae in the photosphere. A safe white-light filter must reach an optical density of about 5, transmitting only about 1/100000 of the incident light, while also blocking harmful ultraviolet and infrared. Solar-observing products complying with the ISO 12312-2 standard are suitable for looking directly at the Sun.
- Narrowband hydrogen-alpha (Hα, 656.28 nm): a dedicated Hα solar telescope isolates the chromosphere with an extremely narrow passband, enabling imaging of chromospheric activity such as prominences, filaments, and plages, presenting a face of the Sun entirely different from white light.
For more background on solar and stellar physics, see stellar physics.
Post-processing workflow
Section titled “Post-processing workflow”Post-processing for planets/Moon/Sun is a dedicated pipeline entirely different from deep-sky: quality-assessment frame selection → alignment and stacking → multiscale sharpening → (optional) derotation and merging.
-
Quality assessment and stacking (AutoStakkert!): read in the
.ser/.avivideo, automatically assess the sharpness of each frame and rank them, select the best frames at a set percentage (often 10%–50% for planets, often about 10% for the Moon), align them locally based on multiple alignment points, and stack them to output a high-signal-to-noise “stacked original”. AutoStakkert can also convert incompatible formats to.avialong the way. -
Wavelet sharpening: use RegiStax, AstroSurface, etc. for multiscale wavelet processing, progressively extracting detail softened by seeing (Jupiter’s cloud belts, Saturn’s ring gaps, crater rims, sunspot structure). Wavelet sharpening is closer to empirical tuning than a fixed formula and requires repeated experimentation with the strength at different scales.
-
Registration and merging: perform color balancing and RGB channel alignment (combined with ADC residual correction), and where necessary use WinJUPOS to derotate and merge multiple results to further reduce noise.
For the parameters and tips of each step, see post-processing techniques.
Common pitfalls
Section titled “Common pitfalls”- Thinking long exposures capture more planetary detail: for bright Solar System targets the limitation is seeing, not signal-to-noise ratio, so short exposures at high frame rates are the right answer.
- Blindly piling on focal ratio: more sampling is not always better—exceeding about 7× the pixel size only lowers the frame rate and amplifies noise without adding real resolution.
- Ignoring altitude: when the target is too low, both atmospheric dispersion and seeing worsen; wait for it to rise higher or use an ADC.
- Recording beyond the rotation constraint: Jupiter beyond about 2 minutes may smear detail due to rotation, so split into clips and derotate as needed.
- Observing the Sun with non-dedicated filters: any uncertified attenuation method may transmit intense radiation in the invisible infrared/ultraviolet bands, causing hidden harm.
References
Section titled “References”- Lucky imaging — Wikipedia — Definition of lucky imaging, the principle of short-exposure frame selection, history, and typical selection percentages.
- Astronomical seeing — Wikipedia — Authoritative explanation of seeing, the Fried parameter r0, coherence time, and their relationship to resolution.
- High-Resolution Planetary Imaging — AstroPix — Rule-of-thumb sampling focal ratios, ROI, video formats, and capture-duration limits for each planet.
- How An Atmospheric Dispersion Corrector Works — Astronomy Technology Today — The prism principle of the ADC, its placement, and its high-focal-ratio operating conditions.
- Use WinJupos to derotate your planetary images — BBC Sky at Night Magazine — Methods for using WinJUPOS to derotate and merge multiple video clips and for RGB registration.
- Solar viewer — Wikipedia — Solar-observing safety standards (ISO 12312-2, optical density 5) and equipment that must not be substituted.