Fixed tripod
Single frame about 10–25 seconds, constrained by the trailing limit; signal-to-noise raised by stacking; the landscape is naturally sharp.
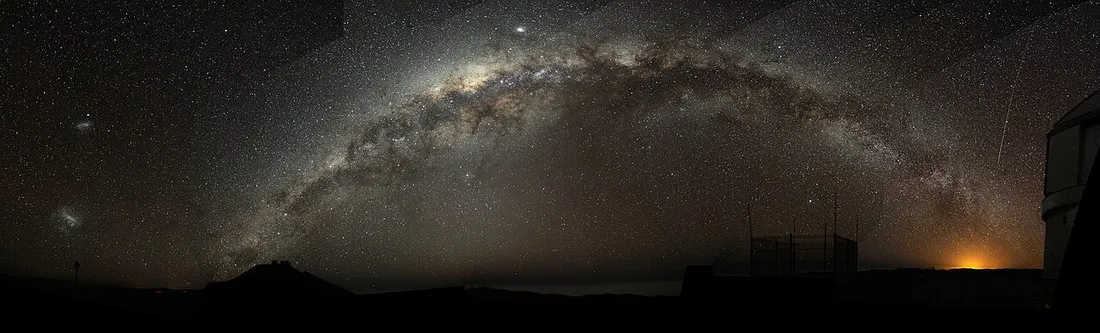
Nightscape photography (widefield / nightscape) refers to the genre of using an ordinary camera with a wide-angle or standard lens to record both the foreground landscape and the night sky (usually with the Milky Way as the main subject) within a single frame. It is the branch of astrophotography with the lowest equipment barrier and the weakest demand on tracking: a camera supporting manual exposure, a fast wide-angle lens, and a sturdy tripod are enough to get started. This page covers equipment selection, the star-trailing limits on a fixed tripod (the 500 rule and the NPF rule), exposure settings, star trackers, stacking for noise reduction and star trails, and the relationship between composition and shooting location.
The equipment for nightscape photography is simple, centered on the trio of “camera + wide-angle lens + tripod,” with a star tracker as an advanced add-on.
| Component | Requirement | Notes |
|---|---|---|
| Camera body | Supports manual exposure (M mode), RAW, long exposures | The better the high-ISO performance (low read noise, large pixels), the less post-processing needed; full-frame, APS-C, and M4/3 all work |
| Lens | Fast wide-angle or standard prime | Commonly 14–35mm (full-frame equivalent), maximum aperture f/1.4–f/2.8; the larger the aperture, the more light gathered per unit time |
| Tripod | Sturdy, wind-resistant | Any vibration during a long exposure blurs the shot; carbon fiber is light, metal is heavy and stable |
| Cable release/remote | Optional, but recommended | Avoids vibration from pressing the shutter; star trails / time-lapse require intervalometer functionality |
| Star tracker | Advanced, optional | Cancels diurnal motion, unlocking minute-long exposures; see below |
The key lens specifications are maximum aperture and edge image quality. Starlight is extremely faint, and a large aperture (small f-number) gathers more light within the trailing time limit; but many lenses show coma, astigmatism, and other aberrations at the edges when wide open, causing stars to trail or take on a winged shape, usually improving noticeably when stopped down 1 stop. The shorter the focal length (the wider the field of view), the longer the allowable single exposure (see the next section), so wide-angle lenses naturally have the advantage on a fixed tripod.
Earth’s rotation drives celestial objects in diurnal motion, and stars continually drift slowly across the frame of a fixed camera. If the exposure is too long, stars stretch from a “point” into a visible “short streak.” To keep stars sharp, the single exposure time must be capped. The angular rate of apparent motion is about 15 arcseconds/second (i.e., 15″ per second, corresponding to the celestial sphere turning 360° every 24 hours), but how many pixels a star trails across the frame also depends on focal length, pixel size, and that star’s declination.
The 500 rule is an empirical formula carried over from the film era:
maximum exposure (seconds) = 500 ÷ equivalent focal length (mm)For example, a full-frame 24mm gives about 500 ÷ 24 ≈ 21 seconds; 16mm about 500 ÷ 16 ≈ 31 seconds; 35mm about 500 ÷ 35 ≈ 14 seconds. For crop-sensor cameras you can switch to the “300 rule” (replace the numerator with 300), or more consistently convert the focal length to its full-frame equivalent and still use the 500 rule.
The 500 rule is simple and easy to remember, but too lenient: it considers only focal length and completely ignores pixel density. It originated in the era of sparse-pixel film/early digital, and on today’s high-density sensors with 40–50 megapixels, stars often already show visible trailing when viewed at 100%. It also fails to account for declination—stars near the celestial equator (declination 0°) move fastest, while those near the celestial poles barely move.
The NPF rule was proposed by the French astrophotography community and incorporates aperture, pixel size, and focal length into the calculation, making it more accurate for modern high-megapixel cameras. Its common (simplified) form is:
maximum exposure (seconds) = (35 × N + 30 × P) ÷ FN = aperture value (f-number, e.g., 2.8)P = pixel pitch, in micrometers (μm)F = actual focal length of the lens, in millimeters (mm)The pixel pitch P can be computed from the sensor’s physical width and horizontal pixel count:
P (μm) = sensor width (mm) ÷ horizontal pixel count × 1000For example, a full-frame (36mm wide) 40-megapixel body with about 7728 horizontal pixels gives P ≈ 36 ÷ 7728 × 1000 ≈ 4.66 μm.
The NPF rule typically gives an exposure time about half that of the 500 rule. Take a 15mm f/2.8 lens as an example: the 500 rule gives about 500 ÷ 15 ≈ 33 seconds, while NPF (for a certain 24-megapixel full-frame) gives about 17 seconds. A shorter exposure means a higher ISO is needed to compensate, which is precisely the reason for using stacking to reduce noise.
The more complete NPF formula corrects for stellar declination: the higher the declination (the closer to the celestial pole), the slower the apparent motion and the longer the allowable exposure. The correction divides the result above by the cosine of that star’s declination cos δ, i.e., t_corrected = t ÷ cos δ. In practice, apps such as PhotoPills include a built-in NPF calculator; you can enter the camera model, lens, aperture, and even the declination your composition faces, and it automatically gives “default” and “accurate” results, the latter being about half the former, and necessary only for large prints where pixel-level scrutiny is required.
When shooting a single frame from a fixed position, the exposure time is “locked” by the trailing limit, and the remaining light-gathering shortfall can only be made up by aperture and ISO. The principles for setting all three are as follows.
Open the aperture as wide as possible: use the lens’s maximum aperture (e.g., f/1.4, f/2.0, f/2.8) to gather as much light as possible. If edge-star aberrations (coma) are noticeable, stop down 1 stop to f/2.8–f/4 in exchange for edge image quality.
Set the exposure time to the trailing limit: set the upper limit by the NPF (or 500) rule, typically 10–25 seconds. Within this range, take as long as possible to keep the ISO low.
Use a mid-to-high ISO: commonly ISO 1600–6400, pushing up to 12800 under dark skies. The principle is that the histogram’s main peak is off the left edge, the Milky Way’s detail is discernible, and the highlights do not clip. Residual noise is handled in post or by stacking.
Manually focus until stars are sharpest: enable live view, magnify a bright star in the frame, and slowly turn the focus ring until it is smallest and sharpest. Do not simply turn to the infinity mark’s hard stop—most lenses overshoot infinity and lose focus.
Format and white balance: always shoot RAW (preserving maximum post-processing latitude); set the white balance to daylight or about 3800–4200K so that frames share consistent tone for easier post-correction, though under RAW the white balance can be adjusted losslessly in post, so it only needs to be roughly right on location.
To break past the exposure limit of a fixed position, there are only two paths: let the camera follow the rotating sky (a star tracker), or shoot multiple frames and stack them (see below).
A star tracker is a lightweight, compact tracking platform mounted between the tripod and the ball head. After polar alignment, it slowly rotates about the polar axis at about 15°/hour (the sidereal rate), opposite to Earth’s rotation, canceling diurnal motion and keeping stars stationary in the frame. This lets you extend a single exposure to 1–4 minutes while stars remain points, greatly improving the signal-to-noise ratio of the Milky Way and faint nebulae.
Common entry-level models and features:
| Model | Payload (approx.) | Features |
|---|---|---|
| Sky-Watcher Star Adventurer 2i | ~5 kg | Classic nightscape entry model, with polar scope and Wi-Fi control, suited to wide-angle to medium focal lengths |
| Sky-Watcher Star Adventurer GTi | ~5 kg | Dual-axis tracking, GoTo auto-finding, supports autoguiding, capable of short-focus telescopes and lightweight deep-sky |
| iOptron SkyGuider Pro | ~5 kg | Light weight (~1.5 kg), optional iPolar electronic polar alignment (can align even when Polaris is blocked) |
The accuracy of polar alignment directly determines the usable exposure length: the more accurate the alignment and the shorter the focal length, the longer the allowable single exposure. Wide angles (≤50mm) are fairly tolerant of polar-alignment error, so a star tracker yields keepers very easily at wide angles.
Fixed tripod
Single frame about 10–25 seconds, constrained by the trailing limit; signal-to-noise raised by stacking; the landscape is naturally sharp.
Star tracker
Single frame about 60–240 seconds, greatly enhancing detail in the Milky Way core and faint nebulae; but the stationary landscape blurs because of the camera’s rotation.
A fixed position cannot lengthen a single exposure, but you can shoot multiple frames and merge them in post, bypassing the trailing limit to improve image quality. There are two distinct uses depending on the merge method.
Shoot many frames of the same composition consecutively (e.g., 10–30 frames), then align and average in post. Random noise falls with the square root of the frame count N—stacking 16 frames raises the signal-to-noise ratio about 4× (√16 = 4), keeping stars sharp and the Milky Way more transparent. On a fixed position, stars move between frames, so you need software that can “align stars + fix the landscape” (e.g., Sequator, Starry Landscape Stacker, DeepSkyStacker) to process the regions separately. For the principles and workflow, see stacking.
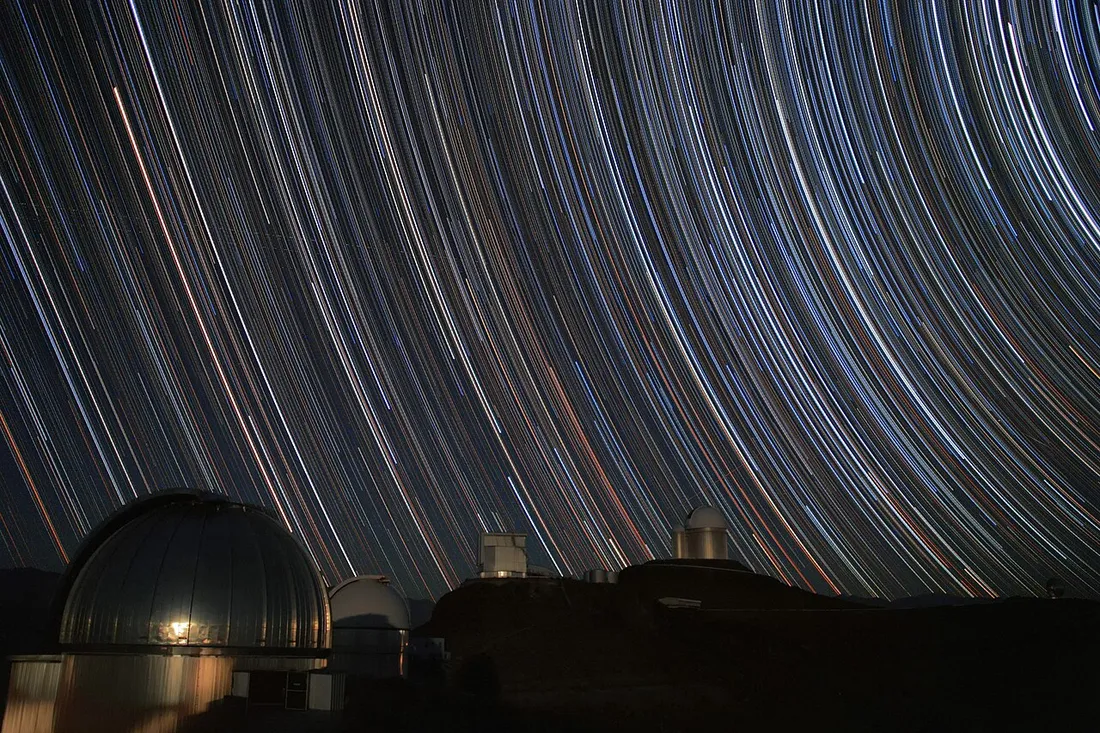
Star trails are a genre that deliberately lets stars stretch into continuous arcs, recording the stars’ diurnal motion around the celestial pole. The technique is not a single ultra-long exposure (prone to overexposure and heavy thermal noise), but rather:
30–60 seconds, with the inter-frame interval as short as possible (<1–2 seconds, otherwise the trails show dashed gaps).1 hour gives about a 15° arc, and a complete circle requires several hours of continuous shooting.Composing toward the north celestial pole (near Polaris) yields concentric circular trails; toward the celestial equator yields nearly straight lines; toward the east/west yields diagonal arcs. Star trails and time-lapse (combining consecutive frames into a video) can often be made from the same set of footage. For concepts such as the celestial pole and circumpolar stars, see diurnal motion.
The brightest part of the Milky Way is the galactic core, located toward the boundary of Sagittarius and Scorpius, and is the primary target of nightscape work. Its visibility varies with season and latitude.
| Period (northern mid-latitudes) | Galactic-core position and visibility |
|---|---|
| February–April (early spring) | Low on the southeastern horizon before dawn (about 3–5 a.m.) |
| May–August (high summer, peak season) | Visible right after sunset; in June–July it hangs high in the southern sky almost all night, with the core nearly vertical |
| September–October (early autumn) | Seen in the southwest during the first half of the night, sinking below the horizon progressively earlier |
| November–January | The galactic core is on the same side as the Sun and not visible in the night sky; during this time winter stars around Orion take the lead role |
Visibility is also constrained by both moon phase and light pollution: a full moon, or the Moon above the horizon, washes out the night sky, so shoot in the window around the new moon or after moonset. When planning, first identify the main constellations and seasonal trends, see constellations; to judge how high a given target can rise at your latitude, see hemisphere visibility.
| Bortle class | Description | Naked-eye limiting magnitude (approx.) |
|---|---|---|
| 1 | Excellent dark-sky site | 7.6–8.0 |
| 2 | Typical truly dark site | 7.1–7.5 |
| 3 | Rural sky | 6.6–7.0 |
| 4 | Rural/suburban transition | 6.3–6.5 |
| 5 | Suburban sky | 5.6–6.0 |
| 6 | Bright suburban | 5.1–5.5 |
| 7 | Suburban/urban transition | 4.6–5.0 |
| 8–9 | City/inner city | ≤4.5 |
The Milky Way is usually clearly visible to the naked eye at Bortle ≤4, and the ideal shooting site is class 2–3. For the concepts of the Bortle scale and naked-eye limiting magnitude, see magnitude and observing conditions respectively; site selection combining weather, moon phase, and seeing is discussed in the latter.
Once you have mastered nightscapes, the next step is to try the longer-focal-length introduction to deep-sky photography, letting the star tracker and autoguiding shoulder a heavier load. Terms can be looked up in the glossary.