This site is organized as a topic tree (astronomy fundamentals, observing, deep-sky objects, astrophotography, reference), but learning a single skill usually requires reading pages scattered across different branches in a particular order. This page strings those pages into five ordered learning paths and serves as a navigation hub: each path corresponds to a clear goal, lists the pages to read in sequence along with in-site links, and explains the problem each step solves.
Each path lists only the key pages, so you can decide “what to read next”; the extended concepts within each page are developed further by that page’s own links. The five paths can be chained together: after completing the observing fundamentals, you can move straight into any of the astrophotography paths.
The table below gives the goal, required gear, and output for the five paths, for easy side-by-side comparison.
Path
Goal
Required gear
Main output
1 Observing fundamentals
Recognize the night sky, understand apparent motion and visibility
None (binoculars optional)
Sense of orientation and the ability to plan observations
2 Remote deep-sky
Acquire deep-sky data without buying gear
None (rent a remote platform)
One processed deep-sky image
3 Deep-sky with your own gear
Build a complete workflow with an equatorial mount and camera
Equatorial mount, telescope, camera
A deep-sky image acquired and processed yourself
4 Planetary imaging
Record surface detail of the planets, the Moon, and the Sun
Long focal length, Barlow, high-speed camera
High-resolution planetary/lunar images
5 Narrowband deep-sky
Image emission nebulae under light pollution and color them
Mono camera, filter wheel, narrowband filters
SHO/HOO-combined nebula images
Path 1 Observing fundamentals
Constellations, apparent motion, magnitude, coordinates, and hemisphere visibility. No telescope or camera required; it is the shared prerequisite for the other paths.
Path 2 Remote deep-sky
Rent a remote platform to acquire raw data, focusing on choosing targets, delivering FITS, calibration, and stacking, while bypassing gear and weather.
Path 3 Deep-sky with your own gear
Build the full workflow from acquisition to final image through optics, sensors, exposure, capture, calibration, stacking, and post-processing.
Path 4 Planetary imaging
The lucky-imaging workflow: framing at very long effective focal length, high-frame-rate video, frame selection and stacking, and wavelet sharpening.
Path 5 Narrowband deep-sky
Narrowband filters, mono cameras, per-channel acquisition, and SHO/HOO channel combination.
Goal: be able to recognize common constellations and understand the apparent motion, magnitude, coordinates, and visibility of celestial objects. No gear is required; binoculars can serve as an optional aid. This path is the shared foundation for the following four paths: choosing targets and judging “can I image it tonight” both rely on the concepts here.
Recognizing the constellations — Use bright stars and constellations to build a sense of orientation, and understand how the 88 International Astronomical Union (IAU) constellations divide the whole sky.
Apparent motion of celestial objects — Diurnal motion (Earth’s rotation, a sidereal day of about 23h56m) and annual motion (Earth’s revolution), which explain why objects rise in the east and set in the west and why the starry sky changes with the seasons.
The magnitude system — Apparent magnitude (m) is a logarithmic scale where smaller values are brighter and a difference of 5 magnitudes corresponds to a brightness ratio of 100; the naked-eye limit is about magnitude 6, used to judge target visibility.
Celestial coordinates — Right ascension (RA) and declination (Dec) form the equatorial coordinate system, the “latitude and longitude” for locating celestial objects; together with hour angle and the altitude-azimuth system they describe an object’s position in the sky.
Hemisphere visibility — From the observing latitude φ and the target declination δ, judge whether an object can rise: δ > 90° − φ is circumpolar (never sets), δ < φ − 90° never rises.
Visual observing techniques — Dark adaptation (about 20–30 minutes), averted vision, recording methods, and using star charts.
The equatorial coordinate system: right ascension/declination act like the sky's latitude and longitude, and are central to step 4 of Path 1 and to all target-selection operations.
Goal: without buying a telescope, acquire raw deep-sky data using professional-grade gear rented through a remote platform, and complete the full process from choosing a target to a finished image. This path bypasses gear purchase, setup, polar alignment, dark-sky locations, and weather watches, making it ideal for first confirming your interest and quickly obtaining your first deep-sky image.
Introduction to remote platforms — Understand how “renting a telescope in the cloud” works: the platform deploys equipment at dark-sky sites, and users issue imaging jobs online and download the data.
Platform comparison — Choose a provider based on budget, gear specifications, the site’s Bortle class, and the billing model.
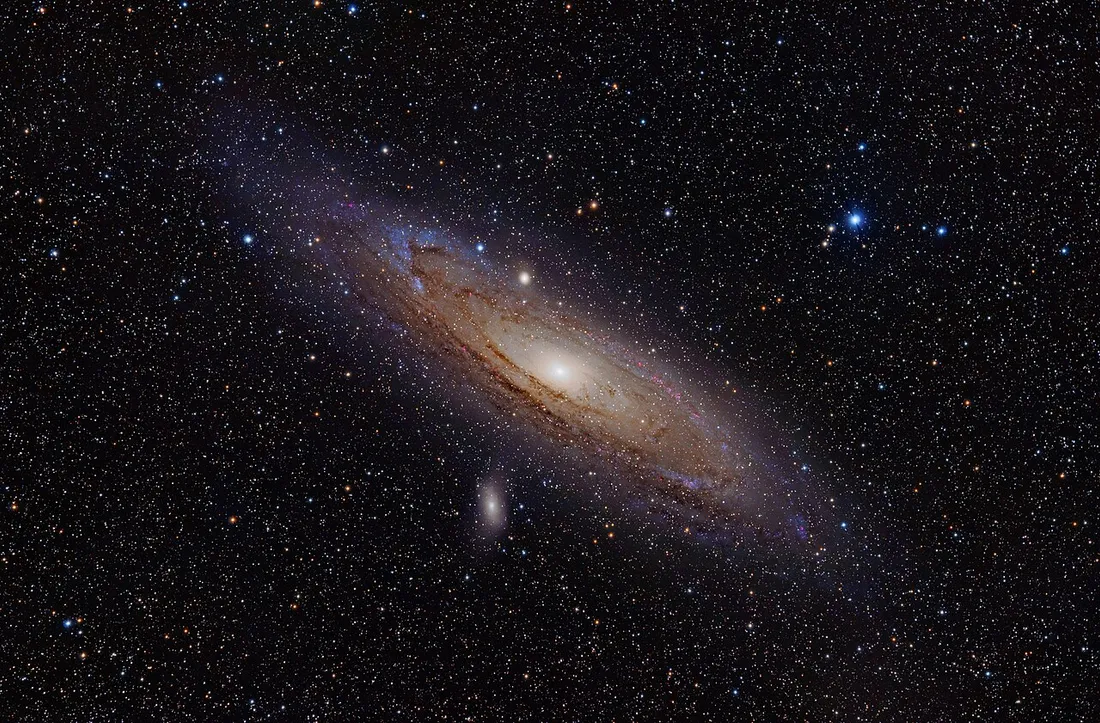
Choosing a target from the object catalog — From catalogs such as Messier (M), NGC, and IC, choose a target that is visible this season and beginner-friendly (e.g. M31, M42, M45).
Submit the imaging job — Set the target coordinates, filters, sub-exposure length, and number of frames as the platform requires, then wait for the raw sub-frames (usually in FITS format) to be delivered. Most platforms handle tracking and guiding, so the user mainly handles the exposure parameters.
Pre-processing and stacking — After registering dozens of sub-frames, integrate them using methods such as sigma clipping to reject outliers like satellites and aircraft and improve the signal-to-noise ratio.
Post-processing workflow — On the stacked master, perform background gradient correction, nonlinear stretching, color calibration, and noise reduction.
Goal: use an equatorial mount and a camera to build a complete deep-sky imaging workflow from acquisition to processing. Compared with the remote path, this path requires mastering the principles of the gear and field operations item by item, in exchange for full control over the whole process.
Optics fundamentals — Focal length, aperture, and focal ratio (f-ratio = focal length ÷ aperture) determine the field of view, light-gathering power, and required exposure; the size of the image circle determines the range of targets that can fit.
Sensor fundamentals — CMOS pixel size, quantum efficiency (QE), read noise, and full-well capacity; the trade-offs between color (OSC) and mono cameras.
Exposure and gain — The trade-off among sub-exposure length, gain, and the number of sub-frames; the goal is to make the background signal swamp the read noise while avoiding overexposing bright stars.
DSO capture in practice — Polar alignment, composition and framing, focusing with a Bahtinov mask, autoguiding (e.g. PHD2), and dithered acquisition sequences.
Calibration frames — Darks remove thermal noise and dark current, flats correct vignetting and dust shadows, and bias frames record the read-out floor, used to calibrate each sub-frame before stacking.
Stacking — Register the calibrated sub-frames and integrate them into a single high-SNR master.
Post-processing workflow — Background correction, stretching, color balance, star treatment, and noise reduction to produce the finished image.
Goal: record Saturn’s rings, Jupiter’s cloud belts, lunar craters, and surface detail on the Sun. Planetary imaging is the opposite of deep-sky imaging in method: the targets are bright but small in angular diameter, requiring very long effective focal lengths and high magnification, and using lucky imaging — recording high-frame-rate video, then using software to select and stack the few sharpest frames by sharpness, in order to counter the jitter caused by atmospheric seeing.
Optics: focal length and the Barlow — Planets need a very high effective focal ratio (commonly f/15 to f/30), extending the effective focal length with a Barlow or teleconverter; since the targets are bright, magnification does not risk underexposure.
Imaging planets, the Moon, and the Sun — High-frame-rate video (tens to hundreds of fps), ROI cropping to read out only the target region for higher speed, and catching the short windows when the atmosphere is steady; the Sun must use a dedicated solar filter or a Herschel wedge.
Key post-processing — Use AutoStakkert! to automatically score and select the sharpest batch of frames to stack, then use wavelet sharpening (e.g. the corresponding tools in RegiStax or PixInsight) to extract detail layer by layer; Jupiter rotates fast, so long sequences require derotation. See post-processing techniques for details.
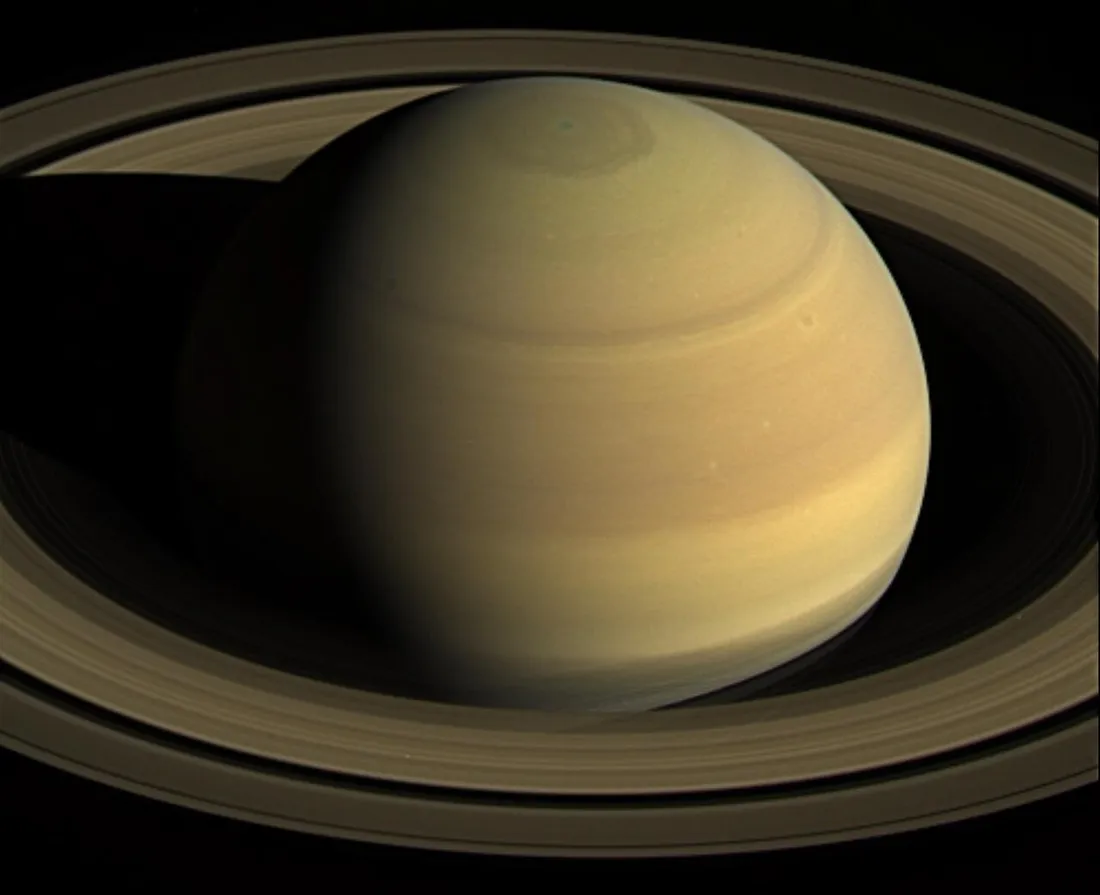
Saturn: the brightness difference between the rings and the disk is pronounced, so wavelet sharpening must control the strength of each layer to avoid artifacts and amplified noise.
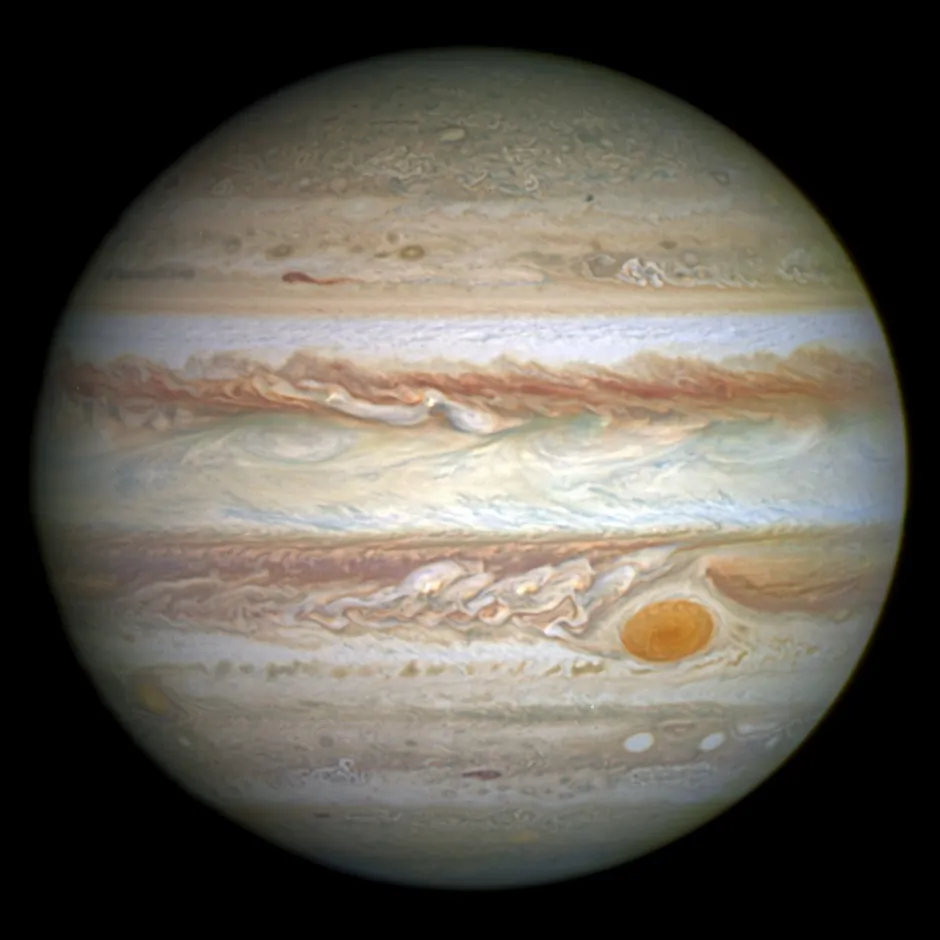
图源 NASA/JPL-Caltech/Space Science Institute · Public domainJupiter: with a rotation period of about 9.9 hours and abundant cloud-belt detail, it is often used to practice lucky imaging and derotation stacking.
图源 NASA, ESA, and A. Simon (Goddard Space Flight Center) · Public domain
Goal: use narrowband filters to acquire the specific emission lines of emission nebulae (Hα, OIII, SII), obtain high-contrast signal in light-polluted environments, and master per-channel combination and SHO/HOO color mapping. This path builds on the gear and workflow of Path 3 and is a dedicated deepening for emission nebula targets.
Signal-to-noise ratio (SNR) — Understand SNR ∝ √N: the signal-to-noise ratio grows with the square root of the number of usable sub-frames N. Narrowband filters have a narrow pass band (often 3–7 nm) and weak signal, which is the theoretical basis for their need for very long total exposures.
Sensors (mono) — Narrowband typically uses a mono camera with a motorized filter wheel for per-channel acquisition; a mono sensor has no Bayer array, giving higher sensitivity and resolution than a color camera of the same model.
Narrowband imaging — Acquire Hα (656.3 nm, ionized hydrogen, the strongest signal), OIII (about 500.7 nm, doubly ionized oxygen, blue-green), and SII (about 671.6 nm, singly ionized sulfur, the weakest signal) separately; moonlight and urban light pollution have little effect on narrowband, so you can image outside the new-moon period.
Nebulae — Learn about the physical mechanisms and typical narrowband targets of emission nebulae, planetary nebulae, and supernova remnants.
Key post-processing techniques — SHO channel mapping (SII→R, Hα→G, OIII→B, the “Hubble palette”) and HOO mapping, green spill suppression (SCNR), star separation, and channel combination.
The signal-to-noise ratio grows with the square root of the number of sub-frames N. This explains why narrowband imaging (especially SII, the weakest signal) usually requires very long cumulative exposure times.
SHO (Hubble palette)
SII→R channel
Hα→G channel
OIII→B channel
HOO (bi-color)
Hα→R channel
OIII→G channel
OIII→B channel
Narrowband SHO color mapping: mapping SII / Hα / OIII to R / G / B yields the iconic Hubble palette; HOO instead maps Hα to red and OIII to green and blue.
Astrophotography — Wikipedia — An overview of the categories of astrophotography, tracking and guiding, stacking, lucky imaging, and narrowband filters.